Frequently Asked Questions:
Create link between the Heatit Z-TRM2fx thermostat and a (Z-Water) relay device:
There are 2 options to link the Heatit Z-TRM2fx to one of the Z-Water relays:
- Using flows, with additional logic, within Homey: the easiest to setup and possible to link to any device (independent of protocol), but will add a minor delay (will not matter in most setups)
- via direct associations between the Heatit Z-TRM2fx and the Z-Water relays: direct communication between the two devices on the same network, without involvement of Homey
How to setup:
Option A. Using flows within Homey
Create the following 2 flows (basic setup):
- Create the first flow to switch on the relay when the Z-TRM2fx goes into active state
WHEN… “Thermostat turned on” (Z-TRM2fx thermostat)
THEN… “Turn on” (Z-Water Relay x)
- Create the second flow to switch off the relay when the Z-TRM2fx goes into idle state
WHEN… “Thermostat turned off” (Z-TRM2fx thermostat) THEN… “Turn off” (Z-Water Relay x)By using the logic of Homey’s flows, you can easily expand the flows with adding additional conditions to only turn on the heater when someone is at home.
In that case, you could:
- Create the first flow to switch on the relay when the Z-TRM2fx goes into active state
WHEN… “Thermostat turned on” (Z-TRM2fx thermostat)
AND… “Someone is at home” (invert the “Nobody is at home” of Presence"
THEN… “Turn on” (Z-Water Relay x)- Create a third flow:
WHEN… “The first person came home”
AND… “Themostat is on” (Z-TRM2fx thermostat)
THEN… “Turn on” (Z-Water Relay x)You’re all set. Relay 8 of the Z-Water should now switch on when the Z-TRM2fx thermostat changes to the active state, and switch off when the thermostat goes into idle state.
Notes:
- “Z-Water Relay x” can in this example be any device Homey is able to control: Z-wave / Zigbee / 433Mhz / Wifi
- Adding additional logic is only possible by using Homey’s flows. This is not possible with Direct associations
Option B. Direct association (Z-wave)
Direct associations are commands send from one Z-wave device to another based on predefined Command Classes.
For correct setup:
- both devices need to be in the same Z-wave network (share the same controller) and need to have the same security state (secured / non-secured).
- Considering the S2 security issues with the Z-TRM2fx and the Z-Water, it is highly recommended to re-include both devices non-securely based on the BETA branch of the Heatit app (> 2.3.0 release).
To setup the right association between both devices
- Lookup the
Device IDof the Z-water regulator by going to device settings > Advanced settings > Z-wave Device Information > Device ID. In this example I will assumeDevice IDis128- The individual relays can be controlled by sending a command to the corresponding endpoint of the Z-water regulators
Device ID. So relay 1 corresponds to endpoint128.1, relay 2 corresponds to128.2, so relay x corresponds to128.x- To setup the correct direct association, go to the device settings of the Z-TRM2fx thermostat you’d like to control that specific relay: Z-TRM2fx thermostat > device settings > Advanced settings > Associations > Group 4
- Add the desired endpoint to Group 4. You should not remove the 1 which is already present; so if you want to add relay 1 of the Z-water device with Device ID
128, update the content of Group 4 to1,128.1(no space in between).
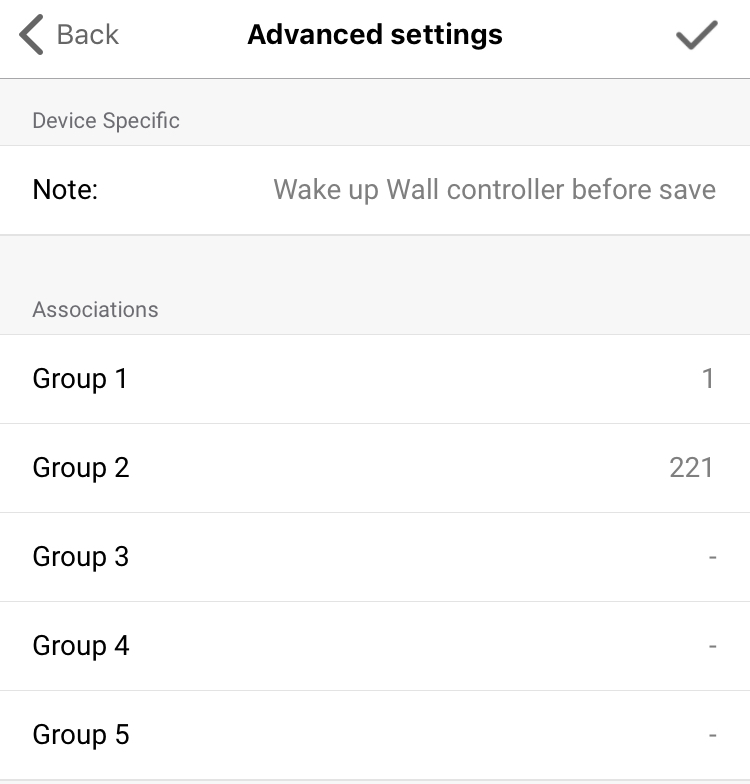
- Press <Back to go back to the advanced settings, the association groups should look like:
- Press
at the top right of the screen (next to the Advanced settings title) to save the associations
You’re all set. Relay 1 of the Z-Water should not switch on when the Z-TRM2fx thermostat changes to the active state, and switch off when the thermostat goes into idle state.


How do I add other devices to the association groups of the Heat-it Z-push button devices
According to the manual:
Set association by operating primary controller/gateway to send association command to the remote control:
When set association from primary controller/gateway, the remote control shall be activated first, if it is not activated, you should activate it manually.
The primary controller/gateway sends association command to the remote control using “Command Class ASSOCIATION” or “Command Class Multi Channel Association”It all comes down to timing of the actions… Since the device will only be awake (able to receive new settings) for 5 seconds.
Otherwise the changed settings should be communicated with the next wake-up, which could take up to 28800 seconds (wake-up interval).Follow the next steps to create a direct association between Z-push button and another device in Homey’s network:
in Z-wave developer tools:
- Open the Z-wave developer tools at: Homey Developer Tools
- Enable logging and filter on
Node[151]: Marked as owhere 151 is the node ID of the Z-push button device- Press and hold the ‘I’ and ‘O’ of group 2 (upper rockers) for 3 seconds; you now should see a ‘Node[151]: Marked as online’ log followed by a ‘Node[151]: Marked as offline’ log 5 seconds later
- Look-up the Node ID of to be associated device, visible in the Nodes overview on the same page, in this example 221 (a Fibaro Dimmer-2)
in the Homey app:
- Open the device settings of the Z-push button device, go to Advanced settings
- In the Advanced settings, go to the associations section and check which button group you want to add the Fibaro Dimmer-2 to. Upper rockers = Group 2
- Add the node ID of the Fibaro Dimmer-2 (221) to the the desired group, in this example add 221 to Group 2
- press ‘< Advanced settings’ to go back to the Advanced settings
- Here comes the tricky part; keep an eye on the filtered Z-wave log and press and hold the ‘I’ and ‘O’ of group 2 (upper rockers) for 3 seconds to wake-up the Z-push button.
- Once you see the ‘Node[151]: Marked as online’ in the Z-wave log of the developers tools, press the check mark at the top right side of the Advanced settings to save the settings to the device
- if the timing is right, you should see the green banner: ‘Settings were saved’
And you should be able to control the dimmer-2 from the Z-push button devicein Z-wave developer tools:
- in the (unfiltered) Z-wave log, you can verify that the command was send successfully:
‘Node[151]: sendData to COMMAND_CLASS_MULTI_CHANNEL_ASSOCIATION, params 0x0102dd’
Here: the ‘params’ can be devided into: 01 = SET, 02 = Group 2, dd = 0xdd = 221