Get a notification when the washingmachine is ready

Get a notification when the washingmachine is ready.

We all like to know when the washingmachine (or dryer) is ready. With a few apps and flows we can make that happen.

What to use

  1. Timer app. In this case i used the Countdown app
  2. Better logic app. Can also be done with the standard build-in logic.
  3. Wallplug behind the machine. In this case i used a Fibaro wallplug.

Start making the variable

We click more/apps/Better Logic. Then we click configure app. There we can make a variable.

1a

We type the name of the variable we want to create. In this case i called it “WashingmachineB”
After that we choose a type and we need a boolean for this.

Then we click “Add variable”

Start making the timer

We click more/apps/Countdown. Then we click configure app. Here we make the timer.

3a

Choose a name for your timer. In this case i used “Washingmachine”

4a

Click “Add timer”

Start making the flows

In this case i used 3 flows. Call the flows whatever you like. I called them "Washingmachine 1, …2 and …3.
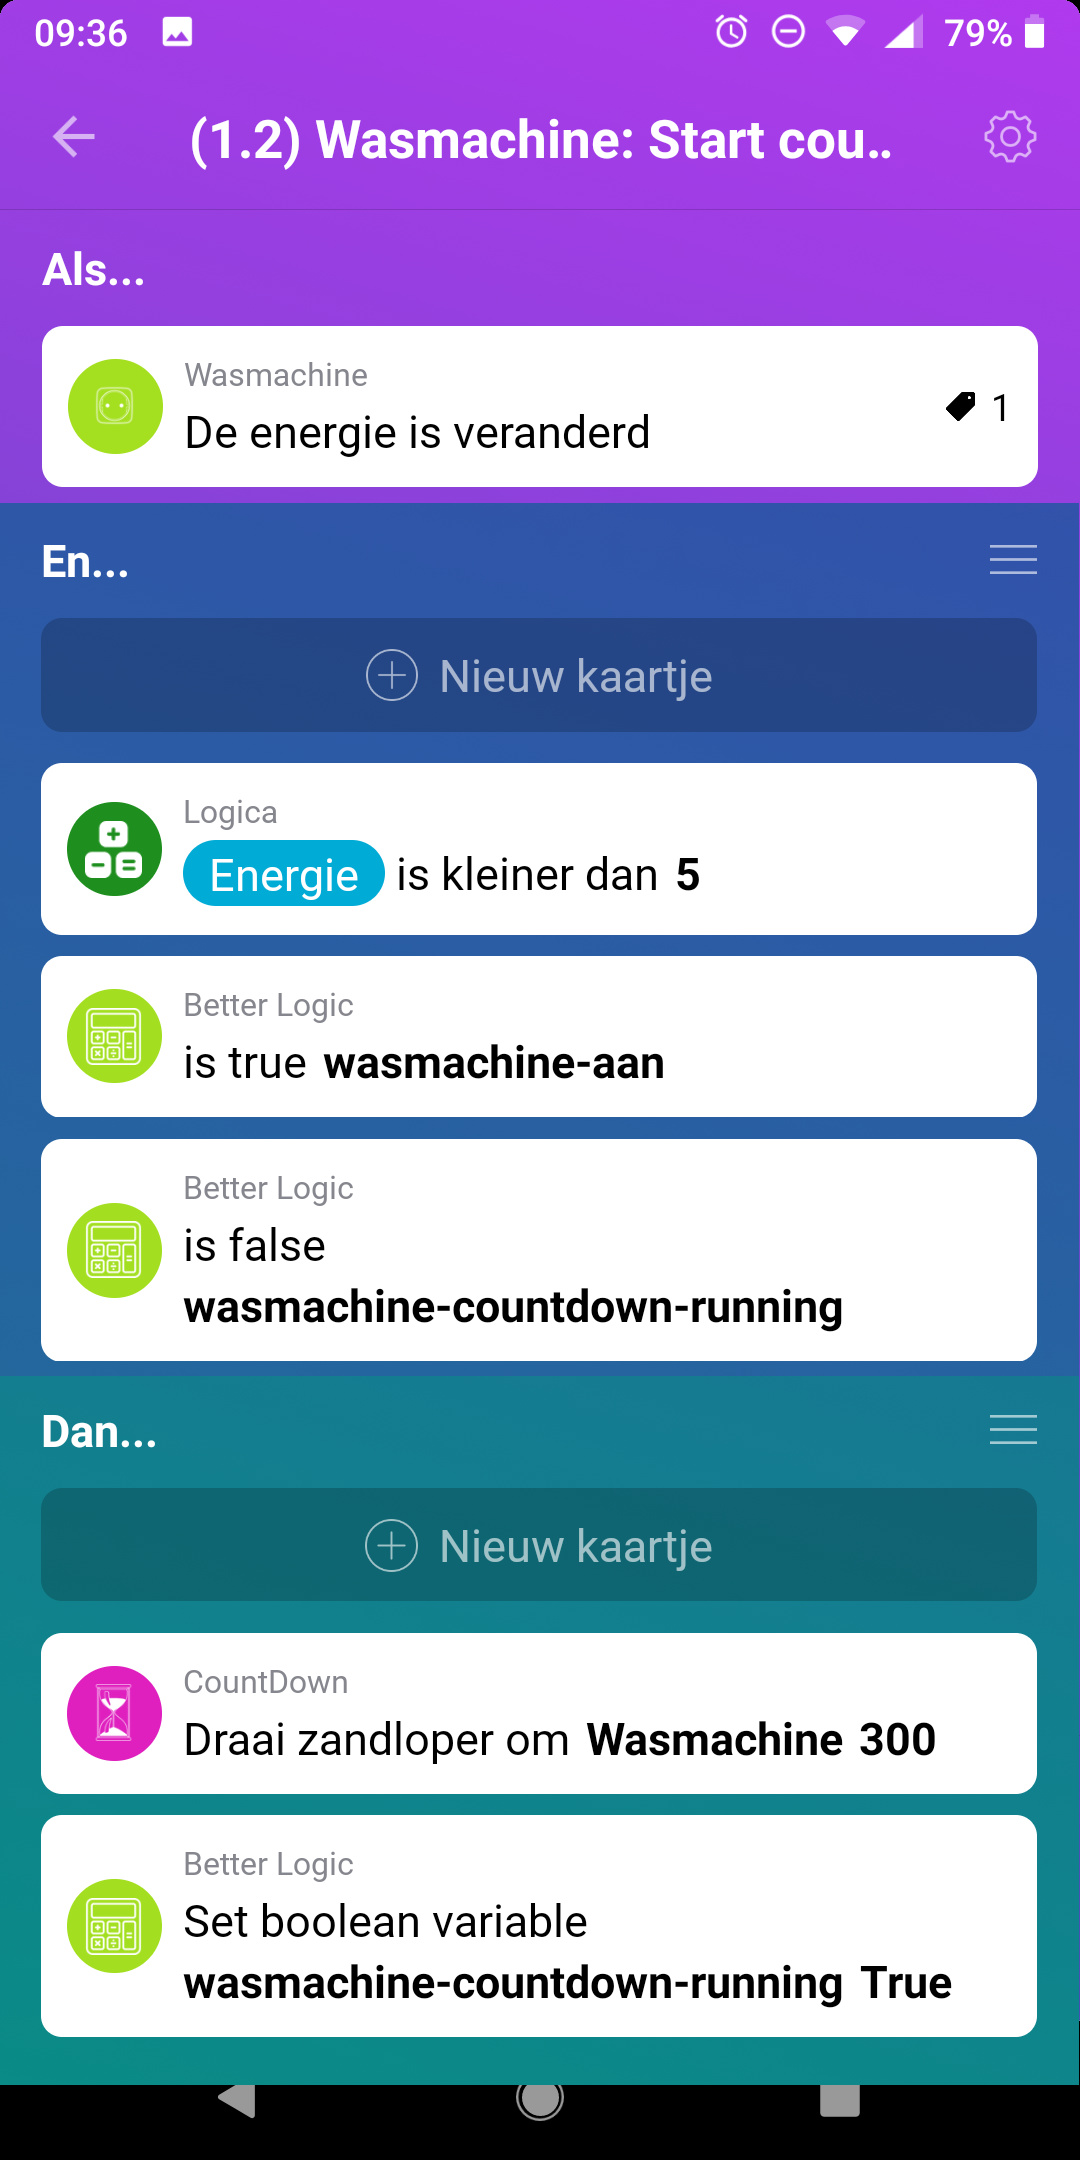
Flow 1

WHEN part

We take the trigger from the Fibaro plug and we choose “The power changed”
No need in clicking the tag at this point, we need the tag later!
Your WHEN part should now look like this:

5a

AND part

In the AND part we first pick a logic card. This is the normal build-in logic card. There we choose “is greater than”. After that we click the grey tag at the top. Then we pick the top tag “power” under “local tags” . In the empty line we fill in 100.

6a

Then we hit the checkmark on the top right. We hit the “Add card” again. This time we choose Better Logic/is true. We hit the value and we choose the boolean variable we just made. “WashingmachineB” in this case. Then we hit the invert button because we want this to be false. Your AND part of this flow should now look like this:

7a

THEN part

In the last part of this flow we choose the Better Logic card for starters and we choose “Set boolean variable” . There we choose “WashingmachineB” and hit the checkmark. Then we pick another card, this time we choose “Countdown” . Then we choose “Stop countdown timer” , click “name” and choose the timer you just created. In my case this is “Washingmachine” . Hit the checkmark. Your THEN part should now look like this:

8a

For the overview of your first washingmachine flow , here is how it should look by now:

Next flow in next post.

18 Likes

The hard part is done

When u managed to get the first flow up and running the rest is gonna be easy. As most likely you understand the explaining part from the first flow, the 2nd and 3rd flow come with a bit less info.

Start making the 2nd flow

WHEN part

We pick the same card as the first flow as a trigger.

5a

WHEN part is done already!

AND part

For the first card in the AND part we pick the logic card again but this time we pick “Less than” and we fill in 10. Then we add a Better Logic card and we pick “is true” . For value we choose “WashingmachineB”.
Your AND part should now look like this:

10a

THEN part

For the THEN part we pick the better logic card for starters and we choose “Set boolean variable” . Click name and find your “WashingmachineB” variable. We set it to “false” .
We pick another card and this time the “Countdown” card. Then we choose “Start countdown timer” . For the name we click on it and find “Washingmachine” , like you made it in the first post. I use 120 seconds in the next empty line but that can be adjusted later if you get any false positives.
Your THEN part for the 2nd flow should now look like this:

11c

And for the overview here is how the complete 2nd flow should look like:

12c

5 Likes

Just leaves us the 3rd flow

For the final part we just need 3 cards.

Start making the 3rd flow

WHEN part

For the trigger part we choose “Countdown” and we pick “Timer reaches zero (0)”. For “Countdown timer name” we choose “Washingmachine”. WHEN part done and should look like this:

13a

AND part

For the AND part we choose Better Logic and we pick “is true” . For value we choose the “WashingmachineB” variable. Then we hit the “invert” before hitting the save button! AND part done and should look like this:

14a

THEN part

For the THEN part there are a lot of options like sending a push notification, blink the lights in the living or play a soundboard file on Homey. So make the last card in the THEN part of this flow whatever you like. I meself have some PhP code running on a Synology and when i make a GET request the Sonos is playing an MP3 file to shout all thru the house that the machine is ready. So here is how the THEN part should look like:

15a

Here an overview of what the 3rd flow should look like now:

Hope you all enjoy my posts of the flows and you guys can make some wicked flows with Homey.
Lets just make Homey greater then it is already!
This post is made after special request by @Bramweer

8 Likes

Time to add some more functionality to the flows

As requested i made some extra cards to add the powermeter to the flows and a notification with the outcome of 1 laundry cycle.

What to use

This is an addition to the flows i posted above. So there is what you need also.

Making the variables

I created 2 extra variables for this. How to create the variables is stated in the top post so no more explanation needed for that.
First we need a variable for the start position. In my example i called it “WashingmachineStart” and it’s a number variable. 2nd variable we need is for the result and in my case i called it “WashingmachineTotal”. It’s a number variable again.

Start making the extra flows

In this case i added 2 extra flows. One for the beginning of the cycle and one for the end.
Before we go on you have to make 2 flows. For the trigger part choose “Flow” and “This flow is started”.
Call them whatever you like but i refer to them later as “Flow 1” and “Flow 2”. Hit save and done.

Flow 1

Now we go edit the first flow you just made.

WHEN part

Is already there if you was still reading along.

AND part

There is no AND part in this flow so leave it empty.

THEN part

Here we pick the Better Logic for starters and we choose “Set number variable” . Name is “WashingmachineStart” and at the value line we click the grey tag on the very right. Then click the tag again in the same line but this time on the left. Find your plug and choose the “Power meter” tag.
Next we choose “Flow” and “Disable a flow” . At select item we pick the number 1 flow you just made. Add a delay of 2 seconds just to be sure the variable is set.
The THEN part is done and your number 1 flow should look like this now:

Flow 2

Now we go edit the 2nd flow you just made.

WHEN part

Is already there if you was still reading along.

AND part

There is no AND part in this flow so leave it empty.

THEN part

Here we pick the Better Logic for starters and we choose “Execute mathjs expression”. In the top line we click the grey tag, find your plug and pick “Power meter”. Click after the tag and add the minus (-) and then click the tag again on the right. Now find the “WashingmachineStart” tag and click it. So the line will be: “Power meter tag - WashingmachineStart”. At “name” we choose “WashingmachineTotal”.

Next we pick “Mobile” and “Send a push notification”. We pick a user ofcourse. Then we click the message line and we start to type: Your washingmachine used (And here we click the grey tag and find “WashingmachineTotal” Then we add a delay of 3 seconds.

Next we pick “Flow” and “Enable a flow”. For item we choose “Flow 1”. Set a delay of 5 seconds.

Next we pick “Better Logic” and we choose “Set number variable”. Choose “WashingmachineStart” and value “0”. Set the delay at 8 seconds. Your 2nd flow should now look like this:

Adding the flow cards to the Washingmachine flows

Now we go back to the flows you made for the Washingmachine like stated in the top post. For the first flow you add 1 card to the THEN part. Card starts with “Flow” and then “Start a flow” . Choose “Flow 1” for the item.

For the 3rd flow you add 1 card to the THEN part. Card starts with “Flow” and then “Start a flow”. Choose “Flow 2”

5 Likes

Now it’s time to see the actual cost of a washingmachine cycle

In the above examples i used the “This flow is started” trigger. There is an issue with this atm. This flow will actually fire dispite the fact it is disabled! So for the meanwhile i created a virtual swith for this. Go add a device, pick Homey for the brand and pick “Virtual Switch” as device.
In my example i called it “WashingmachineVirtual”.

Make an extra variable

For the cost of the cycle we need to know what the cost is of 1 KwH so we need to set that. Make an extra variable and make it a number variable. In my case i called it “KwHtarief”.

Now we need to make 2 extra flows

First flow is to set the normal tariff (daytime). Find the cost of a KwH with your supplier.

2nd is for the low tariff (nighttime)

Now it’s time to adjust the flows we made in the first post.

This is what your first flow should look like:

And this is what your 3rd flow should look like:

We also need to adjust the 2 flows from the 2nd post.

2 Likes

I had regularly false announcements that was was ready because my power, when the machine is done en shut down it stil uses power witch fluctuates between 0,6 - 0,7 watt so every time that happens the countdown is starting again with result my wife gets a push message on her phone. But i noticed that i had som betterlogic cards missing.
I now have the same flows as you. Well wait and see

2 Likes

tot zover ging het goed maar ik heb geen optie start countdown timer bij flow 2

As this conversation is in English we like to keep it in English please. If u followed the guide u have the Countdown app installed? The one from Ralf? Then u should have the option to start a timer after u made the timer itself ofc, Also stated above.

Iam sorry. Yes i have the countdown timer from Ralf. I can’t start countdown timer only turnaround timer, sandloper with endtime, pas zandloper aan, stop countdown timer, stop all sandlopers

1 Like

I have this in the THEN part:

Ow wait. In Dutch it is “Draai zandloper om”

1 Like

thank you very much. I have everthing in the homey and started the washingmachine.

By the first flow i have by then a new kaart simple log: Wasmachine start “tag energiemeter” kWh.

By the thirth flow i have suggested by the ready card “tag energiemeter” kWh so you can see what the washingmachine had used for kWh.
When everthing is good working can we maybe make this better.

At the moment everything well: Wasmachine started 0.72 kWh

2 Likes

No notice he is ready. can it be by flow two set boolean variable washingmachineb false? I see this in an other example.
Now by second start washingmachine also no start sign

You have timer reaches zero is that the same als in dutche zandloper leeg?

U are correct at both points. Should be false in 2nd flow. Will correct this tonight, dunno where that went wrong.
And timer reaches zero is zandloper leeg yes. Sorry for the trouble.

No Problem I am great with your help. I try again. I see by your print screen better logic orange color. By my green is no problem with the icon by flow 1 and 2?

Gonna correct the pics tonight. Had some problems with the BL app so , in between making this screenies I deleted the app and re-installed it again. I’ll fix it tonight.

Edit: Pics and txt fixed.

I also was working on this function and just as @Bramweer I also got some false alarms during a washing cycle.
I did the following which resulted in no false alarms, just 1 valid notification after a washing cycle.

2

Just my 2 cents :wink:

Thanks for this guide! Super helpfull as I am not very confident in inventing these things for myself. :slight_smile: This is a good startingground for me to experiment some more.
Just wondering, why the WashingMachineB as I do not see the usage of WashingMachineA?
Are you using this for other flows?

I used this name and u are free to call it whatever u like. In my case the B stands for Boolean so there is no A.
Be aware that the 2nd flow is not correct yet like stated a few posts up. Gonna fix that tonight.

1 Like